
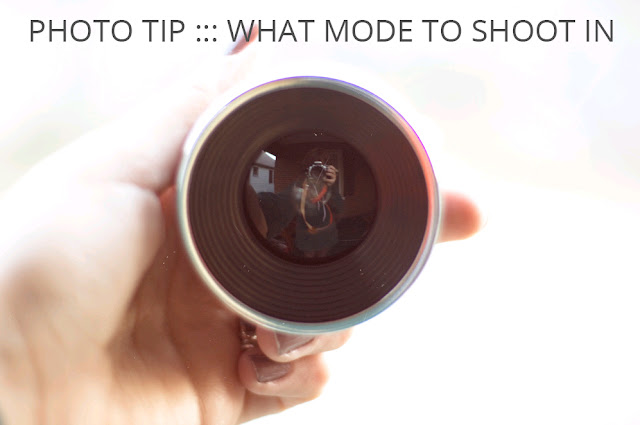
So taking the next step from my last post which was all about photography terms and some camera basics, let's talk about that spinny little wheel with all the letters and pictures on it.
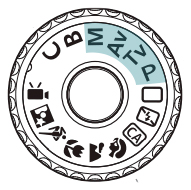
It's called the mode dial. And we really don't care about most of them. Ignore the ones with legit pictures (except video...but that doesn't really count) because they are the 'basic' and 'image' modes and you will never consistently get the look of those photos you love. Sure, you'll find exceptions to the rule, but if you want to always create images you love, using more control is necessary. You want to get all creative - in the 'creative' zone. Here are the 4 main modes explained and in the order in which I propose you use them.

M = Manual aka 'Getting Up Close & Personal with Your Camera'
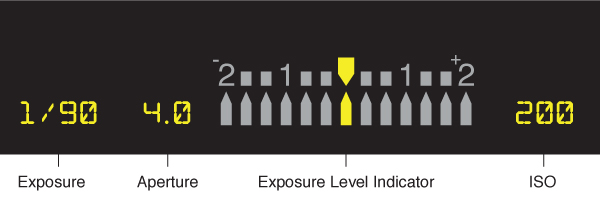
If you really want to learn about your camera, learn to shoot in manual. Manual is how our amazingly talented photo teacher (this guy here) taught us to shoot and swore by it. Here you set the shutter speed and f stop (defined in this post). You control it all! When you look through your camera you will notice a meter usually towards the bottom of the viewfinder OR it also appears on the LCD camera menu (see here). You usually want to hit the '0' in the center by adjusting the aperture and shutter speeds. This setting is great because you can move it to where it works. I pick the f-stop I want to shoot at (usually still 1.4 or 2.8 or whatever is lowest) then adjust the shutter speed to meet the 0 in the center. When I photograph all black dogs, like my foster dog from last year Scout, I will ensure that it is slightly over exposed (closer to the +1) as setting a black object at 0 will usually not photograph all the detail of the dog/object/whatever. You have a lot of control in this setting, but it's not the easiest thing to pick up right off the bat. It's a great way to really get to know your camera though. It is also a bit more difficult if you aren't behind the lens (like outfit photos for me), but do-able.
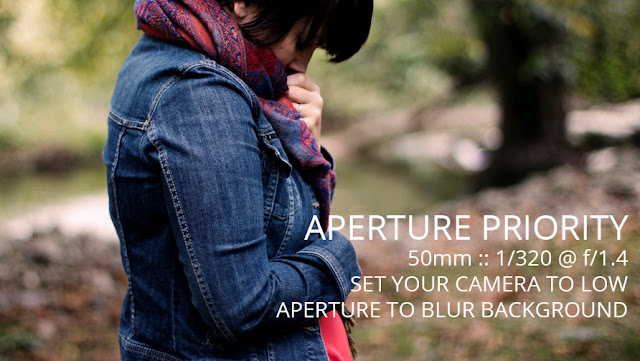
I typically shoot in this mode for outfit photos, dog photos, and anything quick that I don't want to have the accidental mistake of forgetting to set the camera in manual or not having enough time to adjust it. This is a quick and easy way to get what I want. I set my camera to the lowest f stop on my lens by scrolling the dial the controls it - this changes by each camera model and brand. Usually, it is done by the dial in front of the shutter (take the picture) button. For me, this is number usually 1.4 or 2.8, but if you have a camera with a standard kit lens, it will be 3.5 to 5.6. On a kit lens, the further zoomed out you are, the lower you can set the f-stop. Remember, the lower the f-stop, the more you blur out your background. For outfit shots, this is almost always what I want. This also makes taking pictures without flash indoors a breeze. This is an auto mode still, so you don't need to set your camera every time. If you are a beginner, this is a good creative mode to start experimenting with.
PS. Bokeh are the little balls of blurry goodness.

It's basically an all auto mode, it automatically sets your shutter speed and your depth of field It takes in the amount of light and evaluates it and voila! The difference between this and full auto is that you can still change some things, like the drive mode and ISO. You get a teensy tiny bit of control. I do not suggest using this because it can and will set your depth of field very high in certain situations and you get photos that turn out like this where you REALLY wish the background wasn't as in focus, like my friend there double fisting his drinks at my wedding.
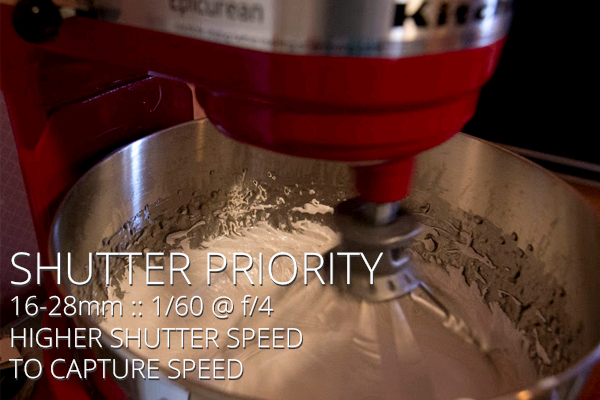
Shutter priority is the cousin to aperture priority. Instead of setting a fixed aperture, you set a fixed shutter speed and it adjusts the aperture accordingly. This is really good if you are taking pictures of yourself doing cartwheels and you want to freeze motion and need to set it to a really high shutter speed. OR freezing motion of water. All in all, for the type of photography I do, I never really use this. It can definitely be really useful, but chances are if you are reading this to find out how I take my photos and want to do similar ones, you aren't shooting sports photography or fountains. The only case that I use this in is when I am taking photos of recipes and want to capture something spinning (like a mixer) or need the highest shutter speed to freeze motion as best as possible and prevent blur.
Also - don't forget - in all of these settings you need to adjust your ISO! In sunlight, always use the lowest ISO available. Really, at any time, try to shoot in an ISO below 1000. My camera can go up to 6400 but you do start seeing some pretty noticable grain. Some cameras have an automatic ISO setting, but I do not suggest using it as it can really throw some things off (especially if you are shooting in manual.) Most camera have an ISO button to press or you can change the ISO in the menu settings. You'll have to refer to the camera manual on that one because it varies so differently.
Just a note, in the images above I have noted what the camera was set to (first number is the shutter speed and the second number is the f stop) and what lens was used for your reference. These are taken from EXIF data which I show on all of my photos in Flickr, more info here.
What kind of photo or design info do you want next? Focusing your camera correctly or taking photos outfit photos of yourself alone? I think the latter requires a video. Or a series of crazed gifs. Or something else completely? Leave me ideas or any questions in the comments!


Catherine, this post could not come at a more perfect time. One of my new years resolutions is to learn how to better use my dslr. I usually shoot on AV mode, and the ISO is left on Auto. ISO is still somewhat of a mystery to me, when I tried shooting in manual I could never quite get it right and had to deal with overexposed photos.
ReplyDeleteI talked a bit about ISO here ( http://www.ofcorgisandcocktails.com/2012/12/photo-tip-dslr-glossary-of-terms.html ) but basically it's taken from film days. Lower numbers in sunny light - higher numbers in low light! And some cameras will over expose or under expose a bit for some reason - the camera I have tends to under expose stuff so I usually step it up a bit.
DeleteOh Katherine thank you thank you thank you for all your wonderful photography posts. They have been so helpful and informative for me. I didn't realize the fstop gets lower in av mode the further out your zoomed but it makes so much sense now! So how do you do close ups and detail shots in av mode? I don't have a dslr (yet) and no fancy lens. I'm baffled by m mode.
ReplyDeletemy camera is basically stuck in aperature always :) and then when I change it to manual I always forget to change it back and my photos come out overexposed/ underexposed grossly the next time :( the ISO bit was really helpful! I've never really played around with it, just kept it on auto, but now I will!
ReplyDeleteMili from call me, Maeby
I end up forgetting a lot on manual too - which is why I do outfits on Av because I don't want to get home and realize I messed up terrible and need to retake them. Changing your ISO is amazing - I swear it's worth it to control on your own.
Deleteahhh you are so amazing!! i usually just shot in auto mode since i didn't know 90% of the options in my camera, but AV is amazing. I'd love to see a post next where it shows how to focus on things. i still don't quite know how to do it unless the subject is in the middle of my shot. i'm totally pinning this!
ReplyDeleteDefinitely! Being able to change focus quickly is a really great thing - especially if you want to shoot like an earring or something for a detail shot and still get most of your face in.
DeleteI think these posts are really useful! I just have a basic digital so I don't think I can alter the shutter speed though. I'd like to - is that possible?
ReplyDeleteAlso - would love tips on shooting by yourself! How you get such great photos with jumping back and forth I don't know. Also tips on overcoming people staring at you when you are posing around in the public park! How to not be shy about that!
aw, i love photography but i'm too stupid to get this all i guess..
ReplyDeletehttp://coeursdefoxes.blogspot.com/
Definitely not Katie! It's a lot to take in - I try and simplify as much as I can. Let me know if there are other questions. It may be easier to start somewhere else for some people, I am jumping in pretty fast here.
DeleteGENIUS!! You are seriously the cutest EVER. Have a super happy first weekend of 2013! Just stopping by from Sugar and Dots to say hello. :) XO
ReplyDeleteThank you! Informative and helpful!
ReplyDeleteTHANK YOU! I need to learn how to better take manual photos.
ReplyDeletealso-- my corgi says hi to your corgi!
Ok, this post was really helpful! Just today I went to a walk to find some mushrooms and take some photos and I really had some problems with the camera for the photos won't get unfocused. Thank you!
ReplyDeleteKisses
http://thedailymiacis.blogspot.pt/
Great tips. We should all stray from auto every once in a while <3
ReplyDeleteBest,
Colour Me Classic
Such a great post, I may use my dslr more. I like changing it up every now and then. Loved how you broke everything down. Happy new year Katherine! /Madison
ReplyDeleteVery helpful tips! :-) Can't wait to experiment!
ReplyDeleteCindy x
www.cindynguyen.ca
this would really come in handy! thank you so much for these tips! i've always loved all your photos. :)
ReplyDeleteI love that you have this post! One of my minors in college was art (concentration in Photography) but it's been almost 3 years now since I graduated and I really needed a refresher! Especially since now I actually own a dslr and all through college I just borrowed one, so I had that gap of time where I wasn't using my skills. Thank you!!
ReplyDeleteThis is amazingly helpful. I definitely need to have a camera day and discover what my camera can do
ReplyDeleteThanks for the tips! I should really try them out, my photos might turn out better. :)
ReplyDeleteI love your style too, the last outfit in that red dress was so beautiful! :*
I'm following you now. :D If you want, you can find me on: http://the-wandering-heart.blogspot.com
Lots of love! <3
Thank you again! I love reading these tips, perhaps if my fiance's T2i doesn't sell I can practice with it. (And to answer your question he has 2 other SLRs but I'm not quite sure what they are)
ReplyDeleteThank you so much for putting this up. I will be playing with my camera today!
ReplyDeletexo
Ashley
Southern (California) Belle
Thanks for the info.
ReplyDeleteI agree, I started shooting in manual mode and I can tell the improvements in my pictures.
This is so helpful!
ReplyDeleteI needed this!
ReplyDeleteWould love to see more on taking self-portraits, as well as learning Manual. :)
Program auto made me laugh out loud. You did this SO well. Be proud!
ReplyDeleteOh I really wish I had read a post like this before. When I got my camera I used manual (sometimes) and tried to learn by googling what aperature, iso, and shutter speed meant but all the articles talked in words I didn't understand haha so I learned super slowly. But this post is awesome, so easy to understand!
ReplyDeleteAwesome! Thank you for sharing.
ReplyDeletehttp://shannonhearts.blogspot.com/
Oh honey, I don't need a tip, I need a manual for hopeless beginners :-))
ReplyDeleteStop by whenever you like, it makes me happy!
Love, Coco
http://www.pinktopping.blogspot.it/
Really helpful tips! I've been shooting manual but you know those memes with dog doing great things that says "I have no idea what I'm doing." Well, sometimes I feel like that. I must keep your posts on camera tips as reminders and get comfy with everything!
ReplyDeleteGreat tips! I forgot most of this stuff from the photography classes I took way back in the day. It's so fun to play around with camera settings and seeing what works/what doesn't!
ReplyDeleteAmazing tips! I'll have to show this post to my hubby!
ReplyDeletexo, Yi-chia
Always Maylee
Nice post, think this will help alot of people <3
ReplyDeletewww.freshminhtea.blogspot.com
Aaah, I just typed out a whole comment and then my internet connection got lost! Boo!
ReplyDeleteIn short: I use A for outfit photos, M mainly when I'm playing around and S to test out Bulb photography. I never really use P, I don't know why! I should try these tips ;)
xo Nikki
Thank you so much for the tips!!! Great post :)
ReplyDeleteThis is an awesome post!! I always love seeing tips from bloggers who's images i adore, you always have gorgeous photos. I have gotten better at using my camera in manual setting but for outfit photos I am usually too freezing (in the winter) to bother, or my brother is taking the photos and has no idea how to adjust the settings. But it does make suuuch a difference. I noticed a big difference just when I got my 50mm lens, it's amazing
ReplyDeletexJennaD
Thanks so much for this Katherine! I really need it as I'm still learning my camera. I haven't made it a priority apparently! I hope we can meet, but it's not looking like it- is it? Well, I am coming here in the springtime. Only for a few days....-Jess
ReplyDeleteThis is so incredible helpful! I never knew what the S stood for and how/why/when to use it! Funny thing, you were actually the one who showed me how to shoot in Aperture Priority when we met up that day and I have been doing so ever since and just recently ventured into shooting Manual (though I still have a ways to go with that one). My hubs on the other hand always switches over to Auto (which I hate now) and I never get that depth that I love. I am going to make him read this when he gets home...haha.
ReplyDeleteYou are awesome Katherine! I know vow to use my AV mode next time I take outfit pictures. I am seriously clueless so these hints help out a ton!
ReplyDeleteperfectly priya
Katherine- thank you thank you THANK YOU!! I seriously needed this series BAD. I just got my first Dslr and have no idea what I'm doing. This is a huge help! I'd love to learn more about taking outfit photos on your own, but really all of those are things I'd love to know. I'm so excited to start messing with my camera now!
ReplyDelete-Jessi
haircutandgeneralattitude.blogspot.com